
Baseboard Installation
After new flooring goes in, the gap at the wall edge is often the detail that makes an otherwise updated room still look incomplete.
Palmer Ranch, FL
For Palmer Ranch homeowners, refined trim is often the point where an interior refresh stops looking piecemeal and begins to feel designed.
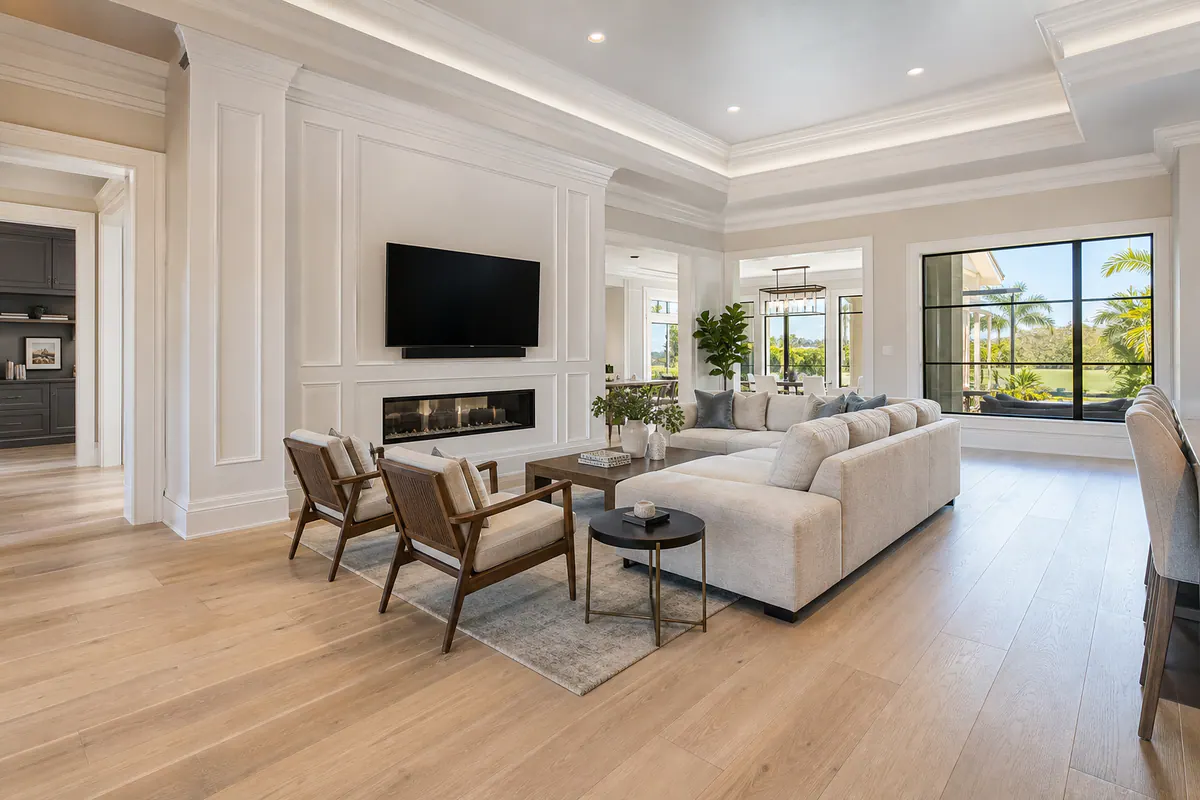
For Palmer Ranch homeowners, refined trim is often the point where an interior refresh stops looking piecemeal and begins to feel designed. Paint can brighten a room, but finish carpentry gives the walls, ceilings, doors, windows, and floors a deliberate relationship. Replacing a narrow baseboard after new flooring with a taller profile that meets matching door casing, for example, gives the floor perimeter and openings a shared visual weight.
That coordination matters in established interiors and remodels, where a new white kitchen, wide-plank flooring, or darker wall color can make builder-basic detailing look undersized or disconnected. Crown molding finishes the wall-to-ceiling junction, casing gives doors and windows a defined frame, and wall paneling adds measured depth to an otherwise broad blank wall. Trim installation Palmer Ranch homeowners choose should relate to door height, cabinet style, ceiling height, and the clean-lined or more traditional character they want to preserve. A substantial casing around a nearby pantry opening can balance cabinet proportions; thin baseboards beside that same cabinetry can leave the room visually unfinished. Conversely, heavily ornamented crown can compete with simple slab-front cabinets and uncluttered walls.
Professional finish carpentry begins with laying out consistent lines across connected rooms, then fitting each piece for a paint-ready result. Even reveals around door openings, tightly closing coped inside corners, aligned baseboard transitions at thresholds, small allowances where materials meet, and smooth caulk lines all affect what the eye sees after painting. Those details allow crown molding, baseboards, casing, wall paneling, and custom accents to read as one coordinated finish rather than separate additions.
Each trim element has its own job, so it helps to choose them by location rather than treating every profile as decoration.
The strongest results come from a coordinated system: casing that relates to baseboard thickness, crown that suits both ceiling height and door scale, and wall details that echo, not compete with, the surrounding profiles. A room with substantial casing, thin baseboards, and ornate crown can feel assembled from unrelated choices. Matching profile families and paint treatment lets each element do its distinct work while the whole space reads as one considered finish.
Scale is the useful starting point. A generous living area with higher ceilings, wide openings, and larger-format flooring can carry more visual weight at the perimeter than a compact bedroom or hallway. In that setting, tall baseboards give the floor line enough presence to hold the room together. A narrow baseboard in an otherwise substantial, updated room can look like a leftover detail, especially beside wide-plank flooring, tall doors, or a large kitchen island.
Ceiling height should guide crown profiles without dictating a single formula. A simple cove, stepped, or squared crown gives a clean-lined room a finished ceiling edge while keeping attention on cabinetry, furnishings, or a view. It is often the better fit where flat-panel doors, slab-front cabinets, and minimal hardware establish a quieter vocabulary. Layered crown combines multiple contours or built-up pieces to create a deeper shadow line; it can support traditional doors, raised-panel cabinetry, arched openings, and other established details. Ornate crown in a minimal interior, however, can feel added on rather than integrated.
Openings provide another reliable scale reference. Wider casing can give tall doors and substantial jambs an appropriately framed appearance, while a slimmer, plainer profile works well around standard-height doors and contemporary flush openings. The casing should also relate to nearby cabinet rails and stile widths: delicate window trim beside heavy traditional cabinetry can appear underpowered, while bulky casing can crowd a small room with low openings.
The goal is not to make every room equally formal. It is to choose proportions that make the largest, most visible spaces feel resolved while allowing bedrooms, halls, and secondary areas to remain consistent without becoming over-detailed.
A blank wall can become a focal surface without relying on a dramatic paint color. Wainscoting creates a finished lower-wall treatment, usually capped by a horizontal rail, and works especially well in dining rooms, entryways, stair halls, and bedrooms where the wall needs definition without being covered from floor to ceiling. Its height should relate to the room and nearby openings: a rail that lands awkwardly across a window sill or intersects door casing can make an otherwise polished room feel poorly planned.

Board and batten uses narrow vertical battens to establish rhythm. It can run as a lower-wall treatment or climb full height for a more architectural feature wall in an office, bedroom, or entry. The spacing changes the effect: evenly sized, wider fields feel calm and contemporary, while crowded battens on a short wall can look busy. Picture-frame molding takes a different approach, using applied rectangular or geometric fields to give a wall tailored structure. It is a strong choice for a dining room, formal sitting area, stair landing, or long hall where the wall has enough uninterrupted width for balanced panels.
Full-height wall paneling, built-up grids, ceiling beams, and boxed ceiling details can add depth in larger rooms when they support the home’s existing character. A clean beam layout may bring definition to a living room ceiling; a layered assembly of rails, stiles, and cap molding can give a feature wall more presence than a single applied profile. The important distinction is restraint: a simple interior usually benefits from squared, shallow details, while more traditional doors and cabinetry can carry layered profiles.
Careful layout is what separates custom trim installation Palmer Ranch homeowners can see as intentional from decorative pieces simply attached to the wall. Panel fields should center or terminate logically around doors, windows, outlets, switches, and likely furniture zones. Consistent spacing, level rails, aligned corners, clean joints, and a smooth paint-ready finish allow the pattern to read as part of the room rather than an interruption. Custom trim Palmer Ranch projects are most successful when the decorative detail gives each wall a purpose without competing with the surrounding casing, baseboards, or furnishings.
The material behind a profile influences just as much as the profile itself, especially once light catches the paint, grain, joints, and transitions around a room. For painted baseboards, casing, crown, and wall details, MDF trim can be a practical choice when a smooth, uniform surface and consistent built-up appearance are the priority. It suits clean-lined painted interiors particularly well, though the selected material should fit the conditions of the specific room rather than being treated as a one-size solution.
Finger-jointed pine is another paint-grade option. It uses shorter wood sections joined together, allowing a straight, workable board for painted trim where visible natural grain is not the goal. It can be a sensible fit for homeowners who prefer a wood-based material beneath paint. The important distinction is finish expectation: joints and grain variation can be prepared for paint, but they are not intended to become a featured visual element.
When casing, ceiling details, or custom millwork will receive stain or a clear finish, solid wood trim gives the grain a role in the design. Oak, maple, cherry, and other species each create a different color, pattern, and degree of visual movement. A stain-grade selection should relate closely to nearby cabinetry, built-ins, doors, or flooring; a close-looking sample under one light can read quite differently beside an existing wood finish. Composite trim may also be useful where a project calls for a particularly stable, low-maintenance material in demanding locations, while keeping the visible profile consistent with adjoining work.
Material alone does not create a refined result. Before fabrication and installation, wall variation, opening dimensions, floor transitions, and existing trim need to be measured so profiles meet cleanly. Tight miters at outside corners, coped joints at inside corners, aligned reveals, properly filled fastener holes, controlled caulk lines, and finish-ready sanding are the details that let painted or stained trim read as a continuous architectural element rather than a collection of separate pieces.
A successful trim project begins with a room-by-room review rather than a profile picked in isolation. A finish carpenter measures openings, notes wall irregularities, and compares existing doors, cabinetry, flooring, and millwork so the new work has a clear visual destination. This is where homeowners can decide whether the goal is a whole-home update or a focused improvement in the most visible spaces.

Profile and material selections are then translated into practical junctions. For trim installed after new flooring, baseboards are planned to cover the perimeter gap cleanly without crowding transitions. During a kitchen or bath remodel, crown molding must end deliberately at upper cabinets, soffits, tile, or ceiling changes instead of stopping at an arbitrary point. New casing and baseboards can also bridge older rooms and renovated areas when their thicknesses, heights, and paint sheen are coordinated.
During interior trim installation in Palmer Ranch, careful fitting is the difference between a planned detail and a merely added one. Corners should meet tightly, casing lines should stay even around openings, and pieces should be scribed where walls are not perfectly straight. After installation, fastener holes, joints, caulk lines, and sanding receive attention so paint-grade trim reads as one continuous finish.
A final walkthrough brings the visual decisions back into the actual space: consistent clearances at doors, clean flooring transitions, aligned returns, and paint preparation that matches the surrounding finish. It gives homeowners a chance to see how each detail supports the completed room before the project is considered complete.
The best place to begin is with the rooms that will benefit most from a more finished visual connection, perhaps an open living area, entry, dining room, primary suite, or the transition between a remodeled kitchen and adjoining spaces. Rather than adding one isolated feature, build a trim plan around how baseboards, casing, crown, wall paneling, or custom decorative details will read together from room to room.
Bring photos of the existing doors, windows, flooring edges, cabinetry, and any trim worth matching. Inspiration images are useful too, especially when you can point to the detail you like: a taller floor line, a simpler casing profile, a paneled feature wall, or a built-up crown treatment. If flooring, cabinets, tile, hardware, or paint colors have already been selected, include those choices so the new millwork can support them instead of competing with them.
A trim carpenter in Palmer Ranch can help turn those references into a practical scope that suits the home’s proportions and finish direction. For example, carrying the same casing through connected rooms may create a stronger result than upgrading only the most visible doorway, while a feature-wall treatment can be reserved for one intentional focal area rather than repeated without purpose.
When you are ready to plan residential trim work in Palmer Ranch, request a consultation for your interior. Share the rooms you want to improve, existing-millwork photos, rough measurements if available, and remodel selections already in hand. A coordinated trim installation plan gives every detail a reason to belong, and helps the completed interior feel settled rather than updated in pieces.
Review the Palmer Ranch, FL service area for local planning context.
When you are ready, request a free estimate with the rooms, trim goals, city, and available photos.
Coordinated baseboards, door and window casing, crown molding, and selective wall paneling create the strongest visual upgrade. The best results use matching profile families and paint treatment so floors, openings, walls, and ceilings read as one finished interior.
Wainscoting is a finished lower-wall treatment capped with a horizontal rail, often used in dining rooms, entries, stair halls, and bedrooms. Board and batten uses narrow vertical battens for rhythm, while picture-frame molding creates applied rectangular or geometric wall fields.
Yes, baseboards can be installed after new flooring to cover the perimeter expansion gap cleanly. The baseboard depth and profile should finish the floor edge without crowding thresholds or other flooring transitions.
Compare trim samples in the actual room beside the floor, door jamb, cabinets, and ceiling line. Use wider casing for tall doors and substantial jambs, carry baseboard and casing families through connected rooms, and match profile complexity to the cabinetry and door style.
MDF is well suited to painted baseboards, casing, crown, and wall details because it provides a smooth, uniform surface. Solid wood is the better choice for stain-grade or clear-finished trim, where species such as oak, maple, or cherry provide visible grain that can coordinate with cabinetry, doors, and flooring.
After new flooring goes in, the gap at the wall edge is often the detail that makes an otherwise updated room still look incomplete.
A crown profile has to look right at the line where the wall meets the ceiling.
Panel spacing, cap height, and the way trim meets a door casing determine whether the finished wall feels intentional or merely applied.
Custom feature walls turn a blank surface into part of the home's architecture rather than treating it as a backdrop for a new paint color.
Cabinetry can be well made and still look unfinished if its edges stop abruptly at the ceiling, wall, floor, or open end.
Start with a visual checkpoint: a low-ceiling room can feel crowded beneath an oversized, layered crown assembly, while a simple profile can give it a clean, intentional finish.
Start with your city, rooms, trim goals, and any photos or drawings that can help clarify the work.